Raspberry Pi Setup
The Raspberry Pi can be seen as the robot’s cerebellum. Is runs ROS, which is then used to enable all the robot parts to talk to each other.
Required material
For this step, you will need:
-
A Raspberry Pi 3
-
A micro-SD card for the Raspberry Pi (16GB minimum !)
-
A computer with a micro-SD card reader
-
The disk image for the ILR project (as a
.zipfile)
Note: The disk image will be given to you as a zip file by the project team.
Flashing the SD Card with the disk image
The tool we recommend using for this step is Etcher, which you can download here.
-
Insert the micro-SD card in your computer
-
Start Etcher. The interface should look like this:

-
Click on Select image and select the
.zipimage provided. -
Click on Select drive and select the SD card.
Warning: Before moving to the next step, double check that the SD card is correctly selected (otherwise the program may try to flash another drive on you computer or connected to it !)
-
Click on Flash!. The process will take several minutes to complete.
-
Once the SD card is ready, take it out of your computer, and insert it in the Raspberry Pi. The SD card should be inserted in the slot at the back of the Pi, with the text facing up (see picture).
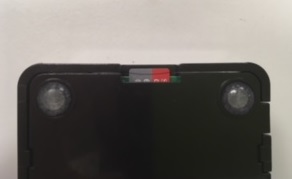
Warning: Be careful not to force too much when inserting the SD card, as you might damage the card and/or the Pi. The SD card will not slide in entirely (see picture).
The Raspberry Pi is now ready. You can process to setting up the router.